Radiwow R-108 / Sihuadon R-108: The KM6NHH Operation Guide
Written by Marc Carson, KM6NHH
I really enjoy using my Radiwow R-108 (also sold as Sihuadon R-108), and I wrote this Operation Guide to help other R-108 users. I can’t find my copy of the manual, and I understand it’s hard to find one online. So I hope the information here is useful for you—please enjoy spending radio time with your R-108. :-)
About this Radio
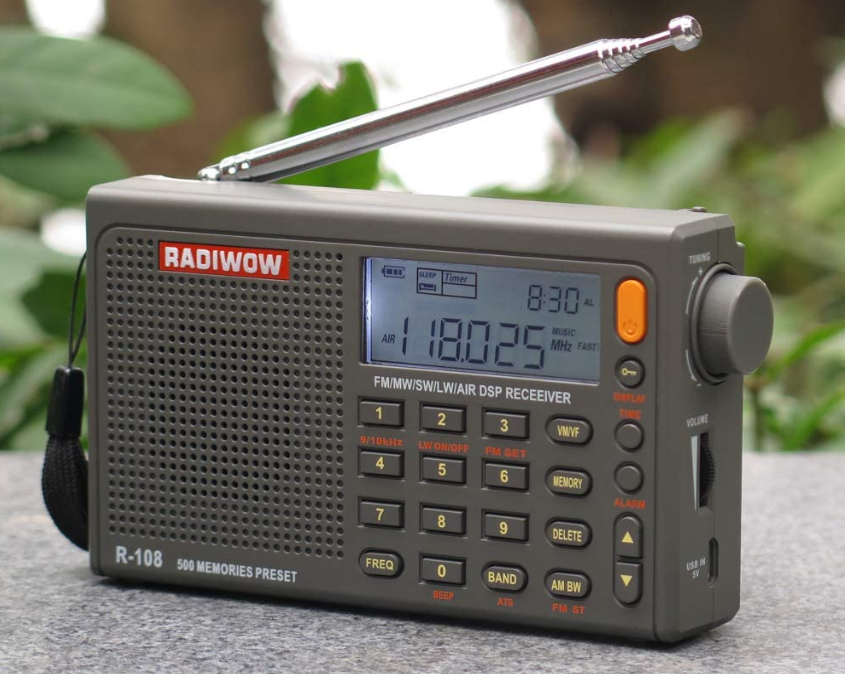
The Radiwow R-108 is a small, portable, multi-band receiver radio. The radio will receive FM, MW (AM Radio in the US), SW, LW, and Air Band frequencies. This radio uses either FM or AM modes depending on the band. It does not include SSB modes for reception.
Available Bands
- AIR Band: 118 – 137 MHz
- FM & FM Stereo: 87.5 – 108 MHz, 64 – 108 MHz, or 76-108 MHz.
- Shortwave/SW: 1711 – 29,999 kHz (1.7 MHz – 29.999 MHz)
- Mediumwave/AM/MW: 520 – 1710 kHz in 10 kHz step setting; 522 – 1620 kHz in 9kHz step setting
- LongWave / LW: 150 – 450 kHz
I have been really impressed with this radio and find it easy to use and pleasant to listen to.
General Operation
- Locking the Radio: Hold down the Lock button. This works even if the radio is turned off. This will prevent accidental button presses. If you are traveling, it’s a good idea to lock the radio when not in use.
- Powering the Radio on: Long-press the Power button.
- Changing the Sleep setting: With the radio off, tap the Power button. When the Sleep setting is shown (a number, or “on”), long-press the power button. Then use the Tuning knob on the side of the radio to change the setting. Then either wait for the display to change, or press Power again to turn off the radio.
- Changing Radio Frequencies or Changing Memory Presets: Use the Tuning knob on the right side of the radio.
- Adjusting the Volume: Use the Volume knob on the right side of the radio.
- Stand: The radio has a stand that can be used to recline the radio while listening. The antenna can be articulated while in this position, so that it runs vertically.
- Display: The display is lit by a white-blue LED. Information on the display can be changed by tapping the DISPLAY button underneath the Power button. The available displays are: Time, Alarm Time, Temperature, and RSSI + Signal / Noise ratio. The RSSI is like a 0-99 signal strength indicator. The SNR reading is on the right side, and you can use it to compare different antennas or listening locations.
- Setting the Time: Hold down the TIME button. Rotate the Tuning knob to set the hour. Tap TIME again. Rotate the tuning knob to set the minute. Tap TIME again to finish setting the time.
- Setting the Alarm: Turn the radio off by tapping the Power button. Hold down the ALARM button. Rotate the Tuning knob to set the alarm hour. Tap ALARM again, and repeat for the minutes setting. Tap ALARM again. The screen will prompt you for an Alarm Sleep setting (How long the radio will play after the alarm time is reached). Rotate the Tuning knob and then tap ALARM again to save the changes. Finally, tap the ALARM button to enable either the radio alarm (Speaker icon) or beep alarm (Bell icon) sound. These icons are small and appear inside the rectangular box at the top of the screen. Tap ALARM a third time to switch the alarm off. Unfortunately the volume of the radio alarm cannot be set.
- You can turn off the alarm by tapping the Power button.
- You can snooze the alarm for 10 minutes by pressing any other key.
- Turning Keypad BEEP on and off: With the radio turned off, hold down the BEEP (0) button at the bottom-front of the radio.
- Switching between 9/10 kHz settings: In the US we use the 10 kHz setting. With the radio powered off, hold the “9/10 kHz” (4) button and then tap it again to change this setting.
- Enabling / Disabling LW / Long Wave reception: If you don’t plan on using LW, this can save you time when switching through the bands. With the radio powered off, hold the LW ON/OFF (5) button and tap it again to change the setting.
- Changing the FM frequency range: In the US you can use the 87.5 base frequency. Or change it to 76, etc. Hold down the FM SET (6) button. Tap again to change the setting.
Radio Operation for Radio Listening
- Changing Bands: Tap the Band button to switch between FM, MW, Shortwave, LW, and Air bands.
- Auto-scanning a full Band and Saving to Memory: In any band, hold down the ATS (BAND) button. WARNING: This may overwrite your current memory presets! ATS WILL OVERWRITE ALL EXISTING MEMORY PRESETS IN THE SELECTED BAND.
- Changing Frequency and Memory Modes: In any band, tap VM/VF button (next to 3) to change between direct frequency entry and memory presets mode.
- Tuning in Frequency Mode with the Tuning Knob: Tap VF to enter direct Frequency mode. Rotate the tuning knob OR tap the UP/DOWN ARROW buttons to change frequencies.
- Changing the Tuning Step Setting: To change the tuning step setting, press the Tuning knob inwards. The screen will show FAST, SLOW, or STOP. In SW mode, SLOW represents a 1 kHz step, with FAST representing a 5 kHz step. In FM mode this represents .01 or .1 MHz steps, respectively.
- Seeking up or down: In Frequency mode, hold the UP/DOWN ARROW button.
- Tuning Directly to a Specific Frequency: Tap FREQ and then type in the frequency, for example 5000. Then tap FREQ again. In FM mode, you can ignore the decimal point shown on the screen and type in e.g. “973” to go to 97.3 FM.
- Saving a Memory Preset: With the desired frequency showing on the screen, press and hold the MEMORY button. Rotate the Tuning knob to select a Preset number, and then tap MEMORY again. Each band offers 100 memory presets, for a total of 500 memory presets.
- Tuning by Frequency in VM Memory / Preset mode: Use the UP/DOWN ARROW buttons to change frequency directly while in VM mode.
- Deleting a Memory Preset: Tap VM/VF to enter Memory / Preset mode. You should see “Preset” appear on the screen. Use the Tuning knob to change to the desired preset. Hold down the DELETE button. You will see “Del” appear on the screen. Tap DELETE again to confirm deletion.
- Changing to FM Stereo Mode / Mono Mode: In the FM band, tap the FM ST button (AM BW)
- Changing the bandwidth of the AM filter: In any AM mode (MW, LW, SW, AIR), tap the AM BW button to choose a bandwidth setting. Generally I use the “4” setting here.
- Squelch Option: Press in the Tuning button on the side of the radio to change the squelch setting.
- VOICE / MUSIC EQ Modes: Hold “4” to switch between these two simple EQ settings while listening to the radio.
Battery
- This radio uses a rechargeable BL-5C battery. I am using an aftermarket XHDATA 1500 mAh BL-5C battery for additional battery life.
- The battery will slowly discharge on its own as the radio screen stays on.
- The battery can be charged via Micro USB cable.
- You can recharge the battery while listening to the radio.
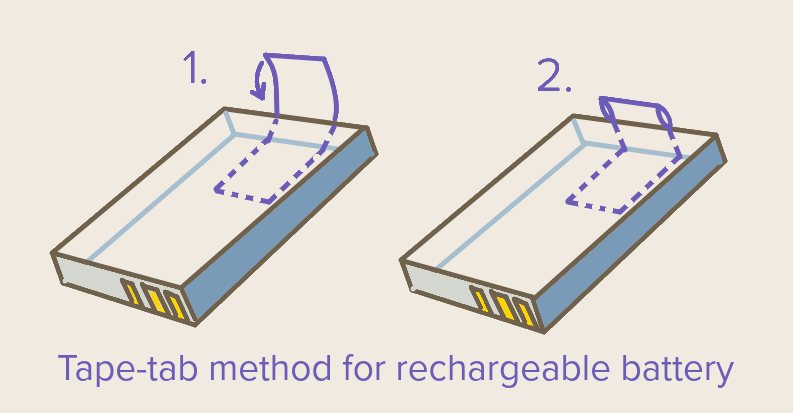
Battery Tips
- To save power, it is a good idea to remove the battery when the radio is not in use.
- You can use the tape-tab method below to make it easier to remove the battery.
- Be careful not to move the metal springs that contact the battery inside the R-108 battery case, as this can prevent the radio from powering on.
- Tape-tab method: In this method, you can apply Scotch Invisible Tape or cellophane tape to create a tab you can pull on to remove the battery.
Start on the back of the battery and apply the tape to the back, then the rear side, then loop it over on itself to create a tab you can pull on (illustration below). Please feel free to make the tab as long as you want for easy access, as the tab shown in the illustration is a bit short.
Antenna and Headphone Jacks
- On the left side of the radio you’ll find 1/8” ANT (Antenna) and headphone jacks. You can plug in headphones and a wire antenna if you’d like. You can also clip on an antenna (see below).
General Remarks
- I like the backlight color on this radio. It’s easy on the eyes, though it may be really bright in extremely dark circumstances.
- The speaker has a nice depth to it and it makes the radio easy to listen to.
- The included bandwidth filter options are really helpful and not really common in such a small radio.
- I like that the radio shows the meter-band reading when you change Shortwave (SW) bands. For example, 31 mb is the 31 Meter Band
- I have tested this radio in the shortwave band with extended wire antennas like Lowbander’s Magic Wand antenna. The results were good and I recommend giving it a try if you are interested in finding additional stations. In my experience, such an antenna can mean the difference between pulling in 5-10 stations (standard antenna) and pulling in 50-70 stations (longer wire). I clip the antenna onto the end of the collapsed telescoping antenna, just extending it about an inch past the radio’s right side.
- It seems it is possible for the AM/MW radio signal to decrease when the band is first selected via the BAND button. To work around this, you can select the AM/MW band via the BAND button, then turn off the radio, and finally turn it back on. This has been seen to increase the signal strength on the AM/MW band.
The R-108 in Action
This video shows the reception of RNZI, Radio New Zealand International, from my location in Mendocino County, California, USA. This radio station was found on the SW / shortwave band.
In this video, you can see that I have clipped the Magic Wand antenna (sitting in a tree across my garden) to the telescoping antenna.
Did this Operation Guide help you? Support the independent, ad-free web! Tips are much appreciated: $2 USD, $3 USD, or $5 USD.